Learning about Property Builder
Setting up your site in Ambiance involves building a virtual representation of all access points on the property. Access points represent points of entry under control by Ambiance. In most cases, an access point corresponds to a lock, such as the lock on a door. However, some access points correspond to different types of hardware such as an elevator reader.
Start by adding the buildings. Then for each building, add all floors. Next, add the individual guest rooms, suite rooms, common areas, meeting rooms and restricted areas on each floor. You can also add elevators and configure elevator access.
Access point types
The following types of access points are created in Property Builder:
- Guest Room—Type of access point assigned to a guest during guest registration.
- Suite—A connected series of guest rooms that includes a common door and one or more inner door access points.
- Foyer Door—A common door that provides access to associated guest rooms and suites. Access to the individual guest rooms and suites is managed independently.
- Restricted Areas—Type of access point intended for staff only for back-of-the-house access. For example, the Electrical Room would be a restricted area.
- Meeting Room—Type of access point intended to accommodate special events for the public and/or registered guests. An Auto-Unlatch schedule can be assigned to a meeting room.
- Guest Common Areas—Type of access point where general access is configured for guests. Access may be unlimited or limited.
- Staff Common Areas—A type of access point where general access is configured for staff. Access may be unlimited (for staff) or limited.
- Elevators—An elevator is an access point type that provides access to building floors. An elevator bank is a group elevators that share the same floor mapping.
Configuring floors and access points
During the process of adding floors and access points in Property Builder, the access point names that you will see in Ambiance are formed. As such, the naming conventions for floors and access points should be descriptive and consistent so that you can create unique names that are easy to recognize when configuring access, making keys and reading reports.

|
Floor and access point names must not exceed 15 characters including spaces. Valid alphanumeric characters: A-Z, 0-9. Valid special characters: -#%=!,.:_()?*'<>/+. |
Name formats
All floor names are formatted using numbers. The numbers that you select are used in the name of the floor. For example, if you select the range 1 to 10 when adding floors, then (using the default prefix FLOOR) you will add ten floors named Floor1, ..., Floor10.
Likewise, access point names are formed the same way with an additional option to format the name using numbers or text. Some access point types, such as common areas, are more suitable for using the text format, Lobby for example. If you use the number format, the floor number and room number are, by default, included in the access point name. For example, if you select the range 1 to 1 when adding a guest room to Floor1, then you will add one guest room named 101 to Floor1.

|
If using Guest Folios (configured in ) and Auto-Format - Room & Check-In/Out is selected, all access point names site-wide must be numeric. |
Advanced formatting options
The simplest way to create descriptive floor and access point names is to use the advanced formatting options. For example, you can select to exclude the floor number from guest room names and/or add a prefix to the guest room number. Because access point names must be unique, you can only select numbers that have been used previously if you also specify a unique prefix or suffix. The advanced formatting options are not available for the text format.
|
|
When creating floors or access points in Property Builder, you can view a dynamic sample of your formatting selections in the Preview area. |
Batch access point creation
To facilitate quick setup, Ambiance allows batch creation of guest rooms, restricted areas, and meeting rooms. You can add multiple access points to multiple floors simultaneously. For example, if you select the range 1 to 10 when adding guest rooms to Floor1, ..., Floor10, then (using the default formatting) you will add ten guest rooms on each floor (101, ..., 110, 201, ..., 210, 301, ..., 310, and so on). The total number of access points equals 100.
Include in mobile keys download file
When licensed for mobile keys, the option Include in mobile keys download file displays when creating and editing access points. The option serves to identify the locks that are equipped to accept mobile key credentials. Select the option to include in the access point in the mobile keys download file, a report generated from the Buildings context menu in Property Builder.
Lock models
For the most current information about lock models, refer to the release notes.
Ambiance supports the following lock models:
- Saflock Quantum/Saflok Confidant and Confidant NFC/Saflok RT, Saflok RT+/RCU (Remote Controller Unit)/Pixel and Pixel+/Saffire LX (L, M & P)
- Saffire LX (D & I)/Saflok MT
-
All lock models for Guest Room, Suite Common Door and Suite Inner Door, and Foyer Door access points support 255 distinct active guest keys. All lock models for Guest Common Areas can manage guest keys for a site deployed with up to 8,192 access points (combination of Guest Room, Suite Common Door and Suite Inner Door access points).
Guest common areas
Guest Common Areas are spaces on your property that are configured for general access by guests and staff, such as lobbies, parking and recreational facilities. In the hospitality industry, we call these amenities. When you create a Guest Common Area access point, you have the option to enable limited access.
|
|
Access to common areas always remains valid until key expiration. New keys cannot invalidate access to common areas. Cancel keys can only invalidate access to common areas when the key status is Active. |
Unlimited guest common areas
When limited access is not enabled, the common area (amenity) is included with all guest registrations and authorized on all Guest Keys. Unlimited Guest Common Areas are also authorized on all Staff Keys.
Limited-access guest common areas
When limited access is enabled, access must be configured in . Essentially, limited Guest Common Areas are associated with guest rooms. Guest access depends on the common areas associated with their assigned guest rooms/suite guest rooms.
When creating the limited common area, you must also select a common area ID. The ID is a numeric value used by the system to synchronize with third-party PMS (Property Management System) settings. There are a maximum of 12 common area IDs to support common areas (guest and staff) and elevators.
Staff access to limited Guest Common Areas is also configured in .
Staff common areas
Staff Common Areas are spaces on your property that are configured for access by staff/vendors, such as an office, kitchen area, and supply closets. When you create a Staff Common Area access point, you have the option to enable limited access.
|
|
Access to common areas always remains valid until key expiration. New keys cannot invalidate access to common areas. Cancel keys can only invalidate access to common areas when the key status is Active. |
Unlimited staff common areas
When limited access is not enabled, the common area is included on all staff keys.
Limited-access staff common areas
When limited access is enabled, the following options are available:
- limit access based on credential—access must be configured in .
- limit access based on common area access profile—access must be configured in .
When creating the limited common area, you must also select a common area ID. The ID is a numeric value used by the system to synchronize with third-party PMS (Application Programming Interface) settings.
Elevators
Configuring elevators to control building floor access involves an elevator technician and Ambiance Site Configurator. dormakaba provides the elevator control box and readers. The elevator technician is responsible for all device installation and wiring. The Site Configurator works in Property Builder to establish elevator access points.
The basic process for the Site Configurator is:
- Add one or more elevator banks.
- Add one or more elevators.
- Map floor access (for each elevator bank).
Elevator banks
An elevator bank is a group of elevators that share the same floor mapping. The elevators must be in the same building, but they do not need to be co-located. The Site Configurator needs to obtain the control box model before adding an elevator bank because the model affects floor mapping.
Elevators
Elevators are added to an elevator bank. You provide a name for the elevator and a name for at least one reader. Readers are devices that interpret the floor access configuration data encoded on a key and communicate with the control box to allow access.
|
|
Although we refer to the elevator as the access point, it is actually the reader that controls access. |
Floor mapping
The Site Configurator maps floor access for each elevator bank. While all floor mapping works the same, the control box model selected when adding the elevator bank affects the options available. Generally, as the number of floors that need to be independently controlled increases, the size of the control box increases.
A control box is a device that contains one or more electrical panels with one or more relay switches. Your site will use one of the following models:
- EMCC - Expanded Multi-Channel Controller—Eight panels with 16 relays per panel.
- MCC 12 - Multi-Channel Controller (Legacy mode supported)—One panel with 12 relays.
- MCC 8 - Multi-Channel Controller (Legacy mode supported)—One panel with 8 relays.
- ECU - Elevator Controller Unit—One panel with one relay.
- MFC - Multiple Floor Controller—Four panels with eight relays per panel.
- RAC 5 - Remote Access Controller—(Non-MFC) Eight panels with eight relays per panel.
The following figure shows the interior of an MFC control box with four panels, eight relays each.
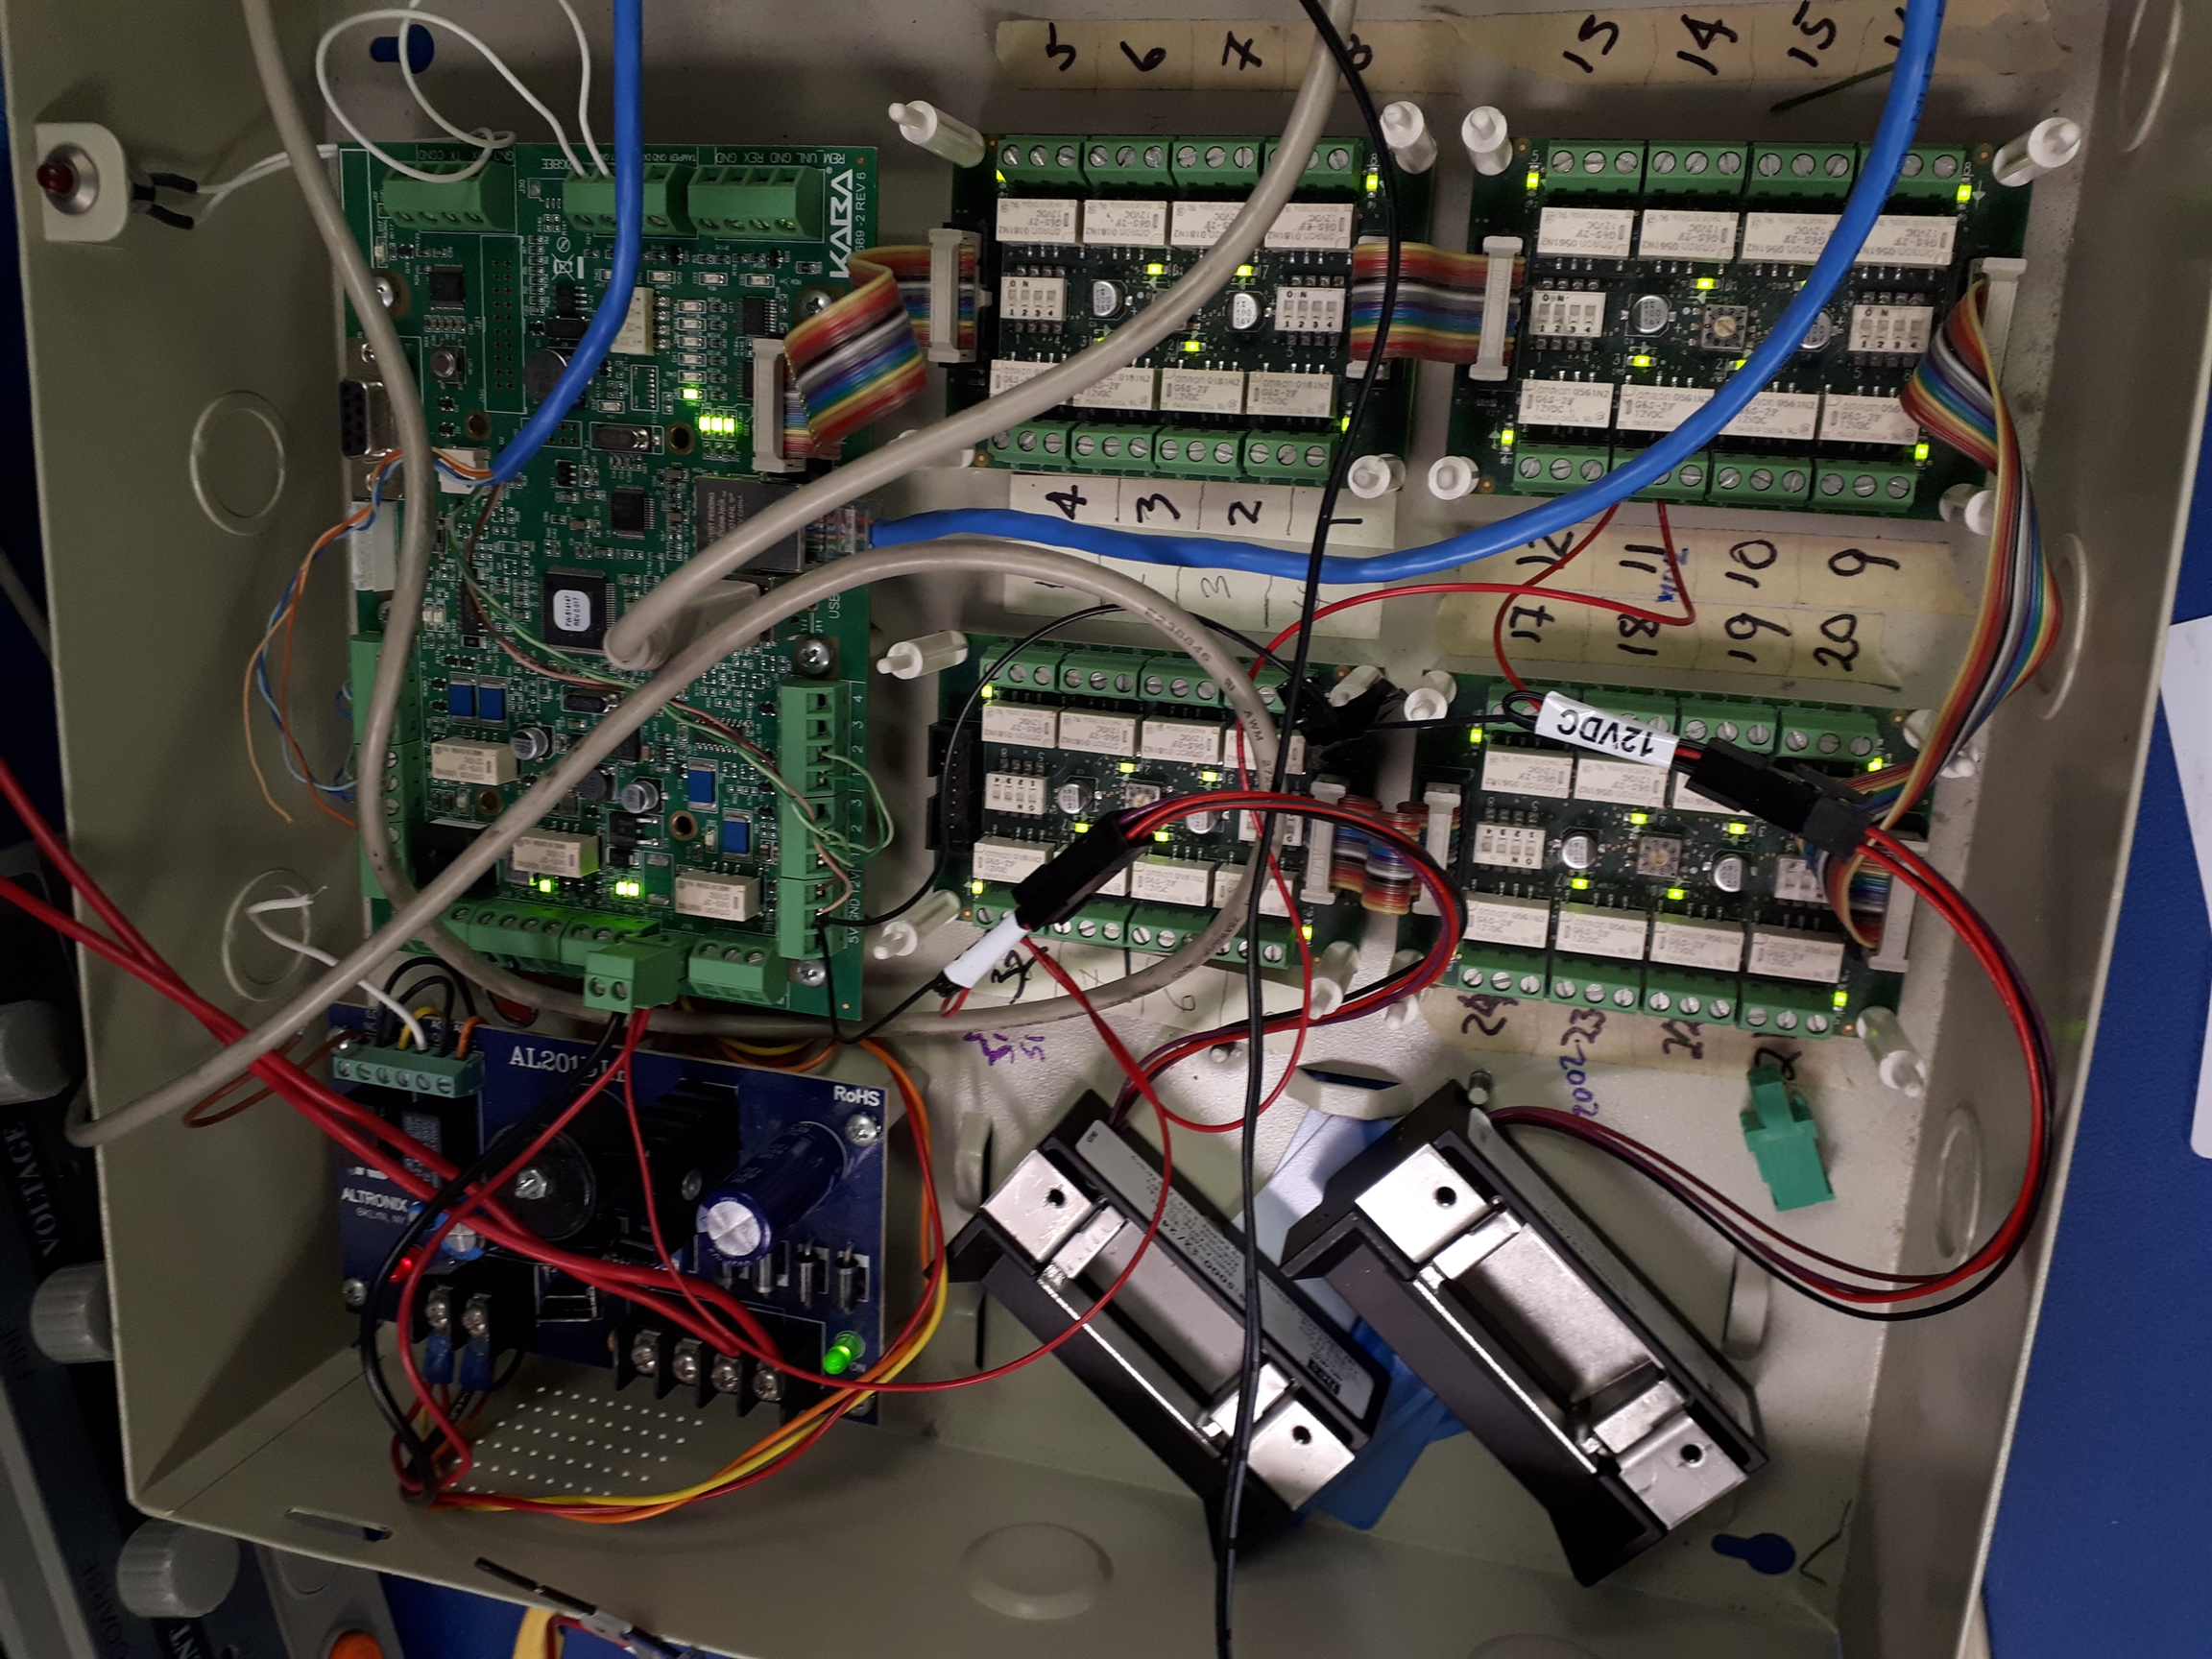
The relays on three of the panels are labeled 1-24. When mapping floor access in Ambiance, relay switches are mapped to floors.
The following figure shows Ambiance floor mapping. Floors 1-3 are mapped to Relay1 (P1R1). All other floors are mapped to a separate relay.
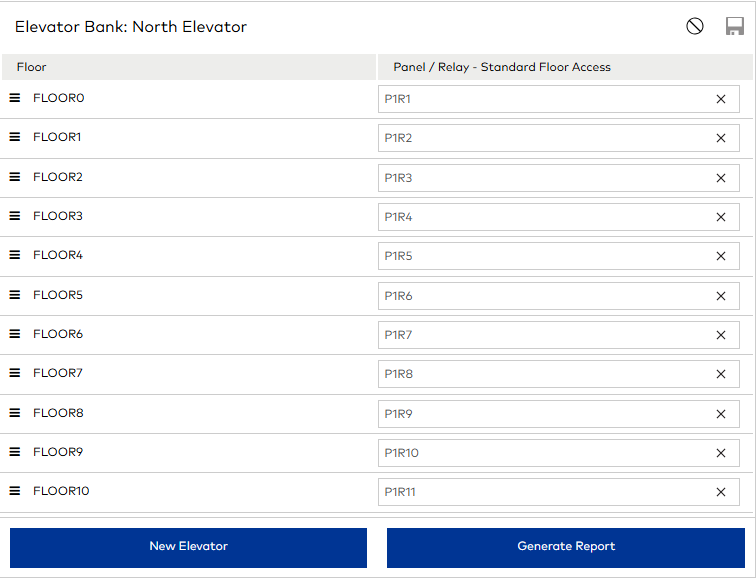
When a Key Holder presents a key to the reader, the reader detects the access configuration encoded on the key, communicates to the control box which relays to open, and illuminates the buttons on the elevator panel that the Key Holder is authorized to access. In some cases, a reader is outside of the elevator to control access to the Up and Down call buttons.
Aside from the basic rule, a floor can be mapped to only one relay, relay-to-floor mapping is entirely configurable. The important thing to remember is that a signal from the reader to open the relay opens access to all floors mapped to the relay. For example, if Floors1-3 are mapped to Relay1 and the floor access encoded on a key is authorized for Floor1 only, the Key Holder will be able to access Floors1-3. Therefore, for maximum control the recommendation is to map one floor to one relay. A reason why you might want to map more than one floor to a relay is if access to two or more floors is always authorized together.

|
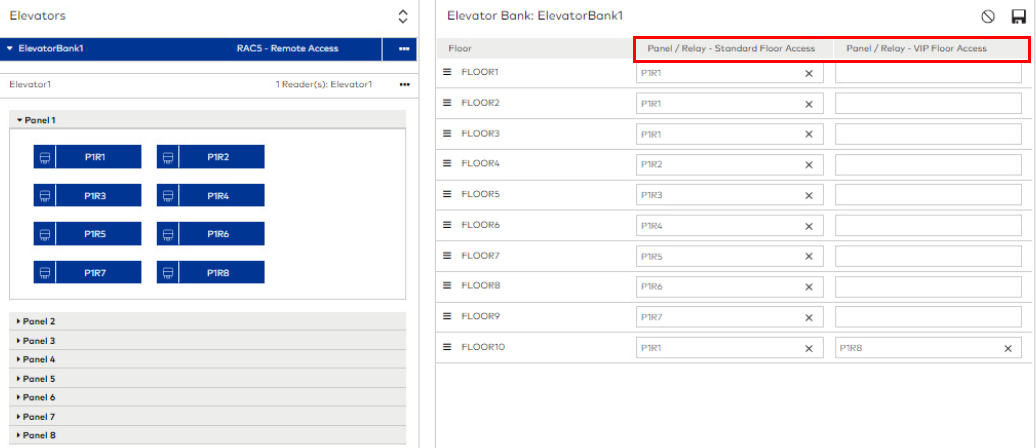
When the licensed feature VIP Guest Registration is enabled and the selected elevator controller is RAC5, VIP floor mapping can be configured to automatically enable the relay associated with the floor where the VIP guest room / suite is located. For example, when a VIP guest lodging on Floor 10 presents their key to the elevator reader, the elevator automatically opens on Floor 10 without requiring the guest to select a Floor option. The following figure shows floor mapping when VIP Guest Registration is enabled and the control panel is RAC5.
|
Ambiance 2.13
Copyright © dormakaba 2025. All rights reserved.
AmbianceTM Software Terms of Use FNL10-02-2023 / Third-party licenses